
How to Remove Mould and Mildew Safely – Professional Cleaning Methods That Actually Work
Safety Tips
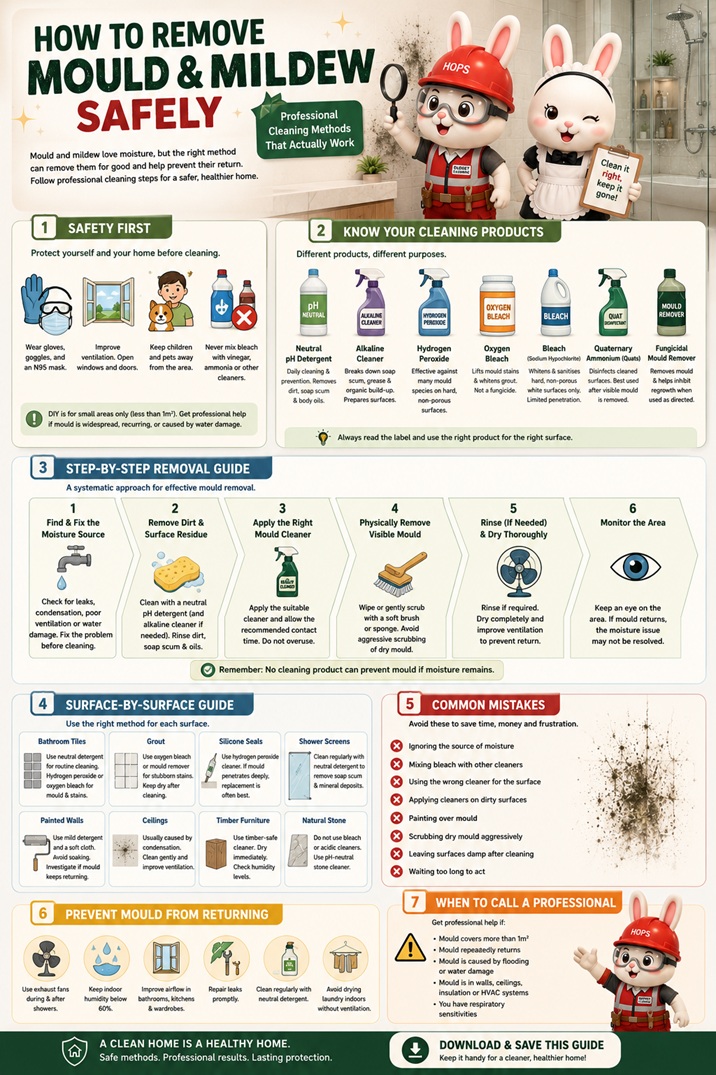
Before attempting to remove mould, protect yourself and minimise the spread of mould spores.
Wear Appropriate Personal Protective Equipment (PPE)
For small areas of mould, wear:
- Disposable gloves
- Safety goggles
- An N95 or P2 respirator mask
- Long sleeves and long trousers
Improve Ventilation
Where possible:
- Open windows and doors.
- Use exhaust fans to increase airflow.
- Turn off air-conditioning if it could circulate mould spores into other rooms.
Keep Others Away
Children, elderly family members, pets, and individuals with asthma or weakened immune systems should avoid the affected area during cleaning.
 Never Mix Cleaning Chemicals
Never mix bleach with:
- Vinegar
- Ammonia
- Toilet cleaners
- Acidic cleaning products
Mixing these chemicals can produce dangerous gases that may cause serious respiratory injury.
Know When DIY Is No Longer Appropriate
Professional assessment and remediation are recommended if:
- Mould covers more than approximately 1 square metre
- Mould repeatedly returns after cleaning
- The mould resulted from flooding or significant water damage
- Mould is growing inside walls, ceilings, insulation, or HVAC systems
- There are signs of hidden moisture that cannot be easily identified
Cleaning Products To Remove Mould and Mildew Safely
Professional cleaners don’t rely on a single “miracle” mould remover. Different cleaning products serve different purposes depending on the type of contamination, the surface being cleaned, and the desired outcome. Some products remove dirt and organic residue, others help remove mould staining, while certain disinfectants are used after cleaning to sanitise hard, non-porous surfaces. Understanding what each product is designed to do helps ensure it is used safely, effectively, and appropriately.
Neutral pH Detergent

Best for Routine Cleaning & Mildew Prevention
A neutral pH detergent is the foundation of routine professional cleaning. Although it is not designed to eliminate established mould, it plays an important role in preventing mildew and reducing the conditions that encourage mould growth by eliminating baseline organic soils.
Effectively Removes:
- Dust & Dirt
- Soap residue
- Body oils
- Organic grime
Common Applications:
- Bathroom tiles & Shower screens
- Vanity tops & Kitchen cabinets
- Painted walls & Vinyl flooring
- Glass surfaces
Alkaline Cleaner
☆
Best for Removing Soap Scum & Grease
Alkaline cleaners are formulated to dissolve greasy and oily residues that are difficult to remove with neutral detergents alone. Removing these deposits allows mould removal products to make better contact with the affected surface and improves overall cleaning effectiveness.
Commonly Removes:
- Soap scum & Body oils
- Kitchen grease & Food residue
- Organic films
Common Applications:
- Bathroom walls & Shower cubicles
- Kitchen splashbacks & Exhaust hoods
- Greasy tiled surfaces
*Because alkaline cleaners can affect some delicate finishes, always check that the product is suitable for the surface before use.
Hydrogen Peroxide-Based Mould Cleaner
Best for Light Surface Mould
Hydrogen peroxide-based mould cleaners are widely used for treating light surface mould on hard, non-porous surfaces. When used according to instructions, they are effective against common mould species and help reduce staining. They work best when visible dirt and soap scum have already been removed.
Key Advantages:
- Produces no chlorine fumes
- Breaks down into water and oxygen
- Less corrosive than chlorine bleach
- Suitable for many bathroom surfaces
Common Applications:
- Bathroom tiles & Ceramic surfaces
- Shower screens & Glass
- Silicone seals
Oxygen Bleach (Sodium Percarbonate)
☆
Best for Removing Mould Stains
Oxygen bleach releases oxygen during cleaning to help lift deep stains caused by mould and mildew. It is primarily valued for aesthetic stain removal and whitening rather than acting as a dedicated fungicide, and is most effective after visible mould has been physically cleared away.
Key Advantages:
- Lower odour than chlorine bleach
- Less corrosive formulation
- Less likely to affect coloured surfaces
- Highly effective for whitening stained grout
Common Applications:
- White grout
- Bathroom tiles
- Concrete & Outdoor paving
Sodium Hypochlorite (Bleach)
☆☆
Best for Whitening & Sanitising Certain Hard Surfaces
Bleach is common but widely misunderstood. Because bleach has limited penetration into porous materials such as timber, untreated plaster, drywall, and some types of grout, it may not eliminate underlying fungal networks. Even when surface stains disappear, mould can quickly return if the moisture problem remains unresolved.
Effective For & Suitable On:
- Whitening white grout & ceramic tiles
- Removing visible superficial mould staining
- Sanitising toilet bowls
- Other hard, non-porous white surfaces
Safety Warning:
Never mix bleach with vinegar, ammonia, toilet cleaners, or acidic cleaning products, as dangerous, toxic gases can be produced.
Quaternary Ammonium Compounds (Quats)
Best for Commercial Disinfection
Quaternary ammonium compounds are widely used in commercial environments, healthcare facilities, hotels, schools, and offices. Rather than replacing the physical cleaning process, quats are deployed to deeply disinfect hard, non-porous surfaces after visible dirt and mould have already been entirely removed.
Used to Sanitise:
- Bathroom fixtures & Benchtops
- Door handles & Commercial washrooms
- Frequently touched architectural surfaces
Professional Fungicidal Mould Removers
Best for Persistent Surface Growth
Professional fungicidal mould removers are specially formulated to target stubborn mould structures on hard surfaces and help actively inhibit spore regrowth. These solutions are commonly integrated into restoration jobs where mould has repeatedly returned or standard consumer cleaners have proven completely ineffective.
Most Suitable For:
- Bathroom tiles & Shower walls
- Ceramic surfaces & Grout lines
- Other hard, non-porous building materials
White Vinegar
☆☆
Best for Light Mildew
White vinegar is a popular domestic alternative that may help remove light mildew and superficial surface mould patches from hard, non-porous fixtures. While useful for introductory cleaning, it should never be considered a substitute for comprehensive remediation where mould has deeply penetrated porous building components.
Commonly Used On:
- Shower screens & Bathroom tiles
- Glass windows & Chrome fittings
Safety Rule: Never mix vinegar with bleach, as this can instantly produce hazardous, airborne chlorine gas.Quick Selection: Which Cleaning Product Should You Use?
| Target Clean Situation | Recommended Cleaning Product |
|---|---|
| Weekly bathroom cleaning | Neutral pH detergent |
| Soap scum and greasy residue | Alkaline cleaner |
| Light surface mould | Hydrogen peroxide-based mould cleaner |
| White grout staining | Oxygen bleach |
| Toilet sanitising | Bleach (where contextually appropriate) |
| Commercial structural disinfection | Quaternary ammonium disinfectant (Quats) |
| Persistent or recurring surface mould | Professional fungicidal mould remover |
Professional Insight
Experienced cleaners know that no single cleaning product works for every mould problem. The most effective approach is to match the cleaner to the surface and the level of contamination while addressing the underlying source of moisture. Without controlling leaks, condensation, or excessive humidity, even the most effective mould-removal products will only provide temporary results.
How to Remove Mould & Mildew Safely:
6 Professional Steps
Successfully removing mould involves more than simply spraying a cleaner onto the affected area. Professional cleaners follow a systematic process that addresses both the visible mould and the conditions that allowed it to grow in the first place.
Identify and Correct the Moisture Source
Before cleaning begins, identify why mould has developed. Without eliminating the source of moisture, mould is likely to return regardless of the cleaning product used. If possible, repair leaks, improve ventilation, or reduce indoor humidity before cleaning the affected area.
Common Causes Include:
- Plumbing or roof leaks
- Bathroom condensation
- Poor standard ventilation
- High indoor humidity
- Air-conditioning runoff
- Flooding water damage
Remove Dirt and Surface Residue
Professional cleaners rarely apply mould removers directly onto dirty surfaces. Soap scum, grease, body oils, dust, and organic residues can create a barrier that reduces the effectiveness of mould-removal products. Preparing the surface first allows the mould cleaner to make better contact with the affected area.
Start the process by:
- Wiping away loose dust with a damp microfibre cloth.
- Cleaning the surface down with a neutral pH detergent.
- Removing sticky soap scum or heavy grease layers where necessary.
- Lightly drying the surface completely before applying any mould treatment.
Apply the Appropriate Mould Cleaner
Select a targeted cleaning product that is suitable for both the specific type of mould and the architectural surface being treated. Apply the cleaner according to the exact manufacturer’s instructions, ensuring the affected area is evenly covered. Allow the product to remain on the surface for the recommended contact time so it can work effectively. Avoid applying excessive amounts of cleaning chemicals, as more product does not necessarily produce better results.
Physically Remove the Visible Mould
Professional mould removal is not simply about applying chemicals. Visible mould should be physically removed after the cleaner has had sufficient contact time. Using a soft brush, microfibre cloth, or non-scratch sponge, gently wipe or scrub the area methodically to remove staining.
Rinse (If Required) and Dry Thoroughly
Some cleaning products require a clean water rinse after use, while others are chemically designed to remain on the surface. Always follow the manufacturer’s operational instructions. Drying the area completely is one of the most important steps in preventing mould from returning.
 Immediate Action:
- Wipe the surface dry with a clean cloth.
- Leave bathroom doors open after showering.
Atmospheric Management:
- Use exhaust fans to improve ventilation.
- Consider a dehumidifier for high baseline humidity.
Monitor the Area
After completing the cleanup, continue monitoring the affected area closely over the following weeks. If mould quickly reappears, it usually indicates that the underlying moisture problem has not been fully resolved. Persistent or widespread mould growth may require a professional property inspection to identify hidden leaks, deeply rooted poor ventilation, or systemic contamination deep within porous building elements.
 The Golden Rule of Remediation

